About Me

Showing posts with label Window's Trick's. Show all posts

Monday, 30 April 2012

Changing Startup and Log-off screens

Startup Screen

  1. Create a 320x400 bitmap in the root directory and name it LOGO.SYS
  2. You can use LOGOW.SYS file in the Windows directory as a starter
Logoff Screens
  1. There are many system file that constitutes Lofoff screen.
  2. They are actually bitmaps 320x400 that just have a different extension
  3. The hidden file in the root directory LOGO.SYS is the startup logo.
  4. There are two files in the Windows directory.
  5. LOGOW.SYS is the Wait while Shutting down ... screen.
  6. LOGOS.SYS is the You may now shut-off or Reboot screen.
  7. Make two new image files of your chice in Paint and name it as LOGOW.SYS and LOGOS.SYS and replce the actual windows file by this two.
  8. But make sure they should be of the same size

To boost performance of your PC or to increase RAM virtually


  • To boost performance of your PC or to increase RAM virtually,
    Right click on My Computer Icon on Desktop
    >> Go to Properties
    >> Go to Advanced
    >> Go to Performance - Settings
    >> Go to Advanced
    >> Go to Virtual Memory - Change
    Keep the initial size same as recommended and maximum size double of it then restart your system.
    It will improve speed of windows and you can play some games which require higher RAM.


  • To Minimise all the application and running windows press the "Windows + M " key together.
  • To Lock a folder in windows XP without any software

        Make a Folder in C drive rename it as "abc" without quotes.
        Now open Command Prompt from Start Menu.
        Type "attrib +s +h C:\abc" without quotes and press enter.
        This command will Make your folder invisble and it can not be seen even in hidden files and folders
        To make it visible again type "attrib -s -h C:\abc"
        You can lock any other folder also by changing the location C:\abc to address of your folder.

    Friday, 13 April 2012

    Sum win7 tricks

    Windows 7 seven users are increasing day by day and it gives you some much of fun exploring the tips, tricks and hidden secrets in windows 7. In this post we had given some of our user suggested tips, tricks and secrets, lets fly around them!!!


    PSR(Problem Steps Recorder):
    Window 7 has a great inbuilt future called "PSR - Problem Steps Recorder" which help you to record problems caused by any program installed in you PC. As a PC guru you are followed by your friends and relatives or by others to make you to solve the irritating small PC software problems ;-( I know you are very frustrated by this because they even don't know how to describe their actual problem.
    But Microsoft knew your pain, So they had came up with a good solution(PSR) by which you can ask your friend/relative/others to run this and send the generated report, So that you can solve their problem with ease.
    Now lets see how to work with it, Just follow this simple steps.
    Step #1: Click on "Start" and type "PSR" and press enter.Now press "Record"
    Step #2: Now run the misbehaving application so that PSR records every thing like every click and key-press, take screen grabs, and package everything up into a single zipped MHTML file.
    That's it you are all set to go and solve the problem.

    Start Up Repair:
    One time or other every body faces this start up problem for a reason or for no-reason, So its good to create a system repair disc straight away in case you run into problems booting the OS later on. Just follow this simple steps.
    Step #1: Click Start > Maintenance > Create a System Repair Disc
    Step #2: Now let windows 7 create a Emergency boot disk.
    If you get to worst case this disk will help you to boot.

    Find out Hidden wallpapers and themes:
    We all knew that while windows 7 is been installed it will ask for your country, Time Zone etc.., Now based on your responses windows 7 will automatically selects which wallpapers to install by default.
    Suppose you had selected your country as India, So that windows seven will install some wallpapers which are related to India.
    To unlock all the wallpapers just follow this simple steps.
    Step #1: Click on Start and type "C:\Windows\Globalization\MCT" in the search box.
    Step #2: Now a window will open with some sub-folders "MCT-AU, MCT-CA, MCT-GB, MCT-US, and MCT-ZA" in which you can select your hidden wallpapers
    Here AU, CA, GB, US, and ZA refers to  Australia, Canada, Great Britain, United States and South Africa.

    Import file over a network to Windows Live MovieMaker:
    In windows 7 by default Windows Live MovieMaker will not give you access to import files over a network, but a simple Registry tweak will make this happen. Just follow this steps.
    Step #1: Run REGEDIT
    Step #2: Now navigate to HKEY_CURRENT_USER\Software\Microsoft\Windows Live\Movie Maker,
    Step #3: Now add a DWORD value called AllowNetworkFiles and set it to 1 to add network support.
    That's it your done.

    Custom Power Switch:
    By default you see the "ShutDown" button on start button. But you are the man who reboots your pc several times a day then you can change "ShutDown" to "ReStart" in a few click by fallowing this simple steps.
    Step #1: Right - Click on Start button.
    Step #2: Choose Properties and set the 'Power boot action' to 'Restart' to make it happen.
    That's it your done!!

    100 Win7 trick's

    Windows 7 has been around for a little while now and so far it is pretty good, the only gripe I have is Microsoft Australia are not offering a family pack (3 copies) like they do elsewhere. In fact one copy in Australia is more expensive than the three pack in the US – ripped off. (I have just found out that you can buy the family pack of windows 7 in Australia but it is only available for December?? and around the $240 mark)

    Anyway, lots (well 100 or maybe 101) of tips and hints for Windows 7 here, some well known others not so.

    Here it goes.

    Right-click an empty part of the desktop and ,instead of needing to go through the display settings, you will find a menu entry to set your screen resolution.

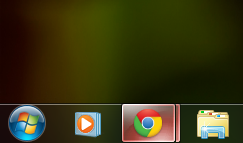
    Right-click the Explorer icon on the taskbar to get speedy access to the Windows folder, Documents and Pictures.

    Generate an Energy Report. To create a report type powercfg -energy in a cmd window and it makes a report named energy-report.html in C:\Windows\system32. It shows you anything in your computer that keep the PC buzzing away wasting power.

    How to Change the Background in WMP12. Run regedit and go to the key HKEY_CURRENT_USER\Software\Microsoft\MediaPlayer\Preferences . Double click on the key LibraryBackgroundImage and enter a value between 0 and 6 (each number is a different style background).

    Windows Logo+Left Arrow and Windows Logo+Right Arrow docks the window to the left or right edge of the screen.

    Windows Logo+Up Arrow and Windows Logo+Down Arrow maximizes or minimizes the window.

    Windows Logo+Shift+Up Arrow and Windows Logo+Shift+Down Arrow maximizes or restores the vertical size of the window.

    Access hidden international themes, just type C:\Windows\Globalization\MCT in the search box and Enter. You will see folders of other countries themes.

    Installing Win7 on a Netbook with a USB Memory Stick. Take a 4GB USB 2.0 flash/thumbdrive and format it in FAT32, then just copy an ISO image to the flashdrive by xcopy d:\ e:\ /d /e (where d: is the DVD drive and e: is the usb drive location).

    Make a system repair disc straight after install just in case you have problems booting Win7 later. Just go to Start , Maintenance , Create a System Repair Disc, and then Windows 7 will build a bootable emergency disc.

    The new Windows 7 calculator looks like my old Vista one, but if you use the Mode menu there are Stats and Programmer views. Also in the Options menu it has unit conversions (weight, length etc.), calculates dates and templates for calculating vehicle usage and loan rates etc.

    WordPad has new formats you can save and open, now you can save or open Word2007 .docx and OpenDocument .odt formats.

    Have the desktop wallpaper act as a slideshow. When choosing your desktop wallpaper picture just hold down Ctrl and click on as many pictures as you like. Then choose how the time delay they change and even choose shuffle and enjoy.

    Change the power switch. Windows 7 shows a shut down button on the Start menu but to change it to something else just right-click the Start orb, choose Properties and set the power boot action to what you want.

    Show hidden drives. Win7 no longer displays drives (mem cards for example) if they’re empty. If you want to see them go to Explorer, Tools, Folder Options, View and untick the Hide Empty Drives In The Computer Folder.

    Alt + P displays or hides the Explorer preview pane

    Windows Logo + G displays your gadgets in front of other windows

    Windows Logo + + zooms in

    Windows Logo + – zoom out

    Make IE8 start faster by getting rid of slow add ons. Click Tools, Manage Add-ons, and check the Load Time in the right column, and you will quickly see which add on is slowing IE8 down.

    If you want to use Windows 7’s XP mode you need to have the Win7 Pro, Ultimate, or Enterprise not Home plus you also have to have a CPU with hardware virtualization support. To find out if yours has download Steve Gibson’s Securable (it’s free).

    You don’t need a seperate burner to burn ISO images anymore, Windows 7 now supports this. Just right click the ISO file and select Burn Disc Image, or easier just double click the ISO.

    Calibrate your screen by typing dccw in the Start Menu. It steps you through adjustments of gamma, brightness, contrast, and colour of your screen.

    You have already got an app open on your desktop and you want to run a second copy, just Shift and click its taskbar icon, and it will open a new instance. Another way (and easier) is to middle-click the taskbar icon.

    To get Windows Live Messenger off the taskbar and back in the system tray where it should be, close Windows Live Messenger and edit the shortcut properties by choosing run in Windows Vista compatibility mode.

    Run cttune.exe to tune up the Clear Type font display. You will get the text looking perfect on your screen.

    If you work on the same folder often, in Explorer right-click Favourites on the left-hand menu, and choose Add to Favourites. It then appears at the bottom of your favourites list for quick access.

    For the visually impaired the Windows 7 Magnifier has two options for providing a bigger display. One is a dock and the other being a rectangular maggy lens that is stuck to the cursor.

    You can rearrange the system tray icons, just drag them to the order you want on the tray or you can even move them outside (and back again) the tray.

    How to disable or uninstall IE8 in Windows 7. Click on the Start Menu and go to Control Panel and find Programs and Features. Click on the Turn Windows features on or off link on the left side and uncheck the box next to Internet Explorer 8.

    Disable Aero Shake in Windows 7. Run regedit.exe and find the key HKEY_CURRENT_USER\Software\Policies\Microsoft\Windows , right-click on the Windows key and make a new key called Explorer, right-click on the right-hand side and make a new 32-bit DWORD with these details Name: NoWindowMinimizingShortcuts , Value: 1 .

    Add Videos to the Start Menu by just a right-click Start, select Properties then click Customize. Choose Display as a link in the Videos section near the bottom.

    Windows 7 Paint the Ribbon UI, which lets you customise it and has the great live formatting previews.It also has new brush strokes, shapes, and grid support.

    Control Panel has a new tool that allows you to save your usernames and passwords, it’s called Credential Manager. These credentials are saved in a Vault, that can be backed up.

    Use BitLocker To Go to encrypt data on USB memory stick or other removable storage device, with a digital certificate or a password for access.

    Turn Your Windows 7 Laptops Into Wi-Fi Hotspots. Microsoft’s Windows 7 has something called Virtual WiFi that makes one wireless card act as several separate one. Just go and use the free software Connectify and make you notebook/laptop/netbook into a Wi Fi Hotspot for free.

    Install the best free antivirus/security suite for Windows 7. Just install Microsofts own Security Essentials, free , fast and does the job well.

    Install Windows 7 on your Netbook. Use IMGburn to convert your Setup DVD to an ISO. Copy the ISO to a USB memory key by using Microsofts Windows 7 USB DVD Download Tool. Reboot the netbook and boot off of the USB mem key and follow the instruction to install.

    You can move windows across multiple monitors without having to minimize or shrink the window first.

    Pin up the folders you use most to your taskbar. Just hold your mouse over the folder, click and drag it onto the taskbar. Windows 7 automatically pins it to the Explorer Jump List.

    Change the order of your Taskbar by simply dragging them to whatever order you desire. And you can launch the first five icons with a simple keystroke: just by pressing Windows+1, windows+2 etc.

    Windows 7 automatically reduces screen brightness after a period of inactivity (a bit like mobile phones do) but Windows 7 adapts to your activity. For example, if the screen dims after 30 seconds and you immediately move the mouse to brighten the display, Windows 7 will wait 60 seconds before dimming the display again. Good when watching videos – actually I am sure my Vista does this as well.

    On the Windows 7 Start Menu, the default power option is a simple shut down and that is what I want. Bit, if you want something else, you can simply change it to default to Switch User, Log Off, Lock, Restart, or Sleep. All you do is Right click on the Start button, Properties, Start Menu tab, choose the Power Button Action that you want. A lot better than how to change the shutdown button in Vista

    Windows 7 includes a great taskbar preview feature where, if you hover over an open program’s taskbar icon, a preview pops up and where you can switch to or even close the program. By default you have to hover over the icon for a short time (400milliseconds) for it to pop up. I would like it a bit quicker and you can do it by a registry change. Just get into regedit, and go to HKEY_CURRENT_USER -> Control Panel -> Mouse. Double-click on MouseHoverTime, and set the value, in milliseconds (say, 200) to whatever you want. Click OK and exit and restart.

    Well that is it, I am not counting to see if there are 100 tips and hints for Windows 7 but it must be close. I will keep adding more when I come across them.

    What is GodMode actually?

    What is GodMode actually?
    A  GodMode is a hidden folder which provides a single place to access all Windows-Settings without needing to browse options and folders in the Control Panel.

    GodMode is actually a developer shortcut in Windows 7/ Windows Vista that provides more direct access to features and functions of the operating system. To be clear, GodMode doesn't add functionality. But it helps administrators work more efficiently by collecting all these tweaks and controls in one place.


    Accessing GodMode in Windows 7/ Vista.

    1. Create a new folder wherever you want the GodMode folder to be. Right-click in Windows Explorer. Select New > Folder.
    2. Now name the folder as: 
    GodMode.{ED7BA470-8E54-465E-825C-99712043E01C}
    You can name the folder anything you like as long as you add a period followed by exact text string within the braces

     
    The folder icon should be replaced  by the Control Panel icon, and the folder should now be filled with a variety of tweaks and tools.
    There are many other hidden developer folders in Windows 7/ Windows Vista that provides more direct access to features and functions of the operating system.

    To access all of those:
    • Open Notepad: Start > All Programs > Accessories > Notepad.
    • Copy and paste the following code in the Notepad:
    mkdir "Special Folders
    cd ".\Special Folders
    mkdir "God Mode.{ED7BA470-8E54-465E-825C-99712043E01C}
    mkdir "Location Settings.{00C6D95F-329C-409a-81D7-C46C66EA7F33}
    mkdir "Biometric Settings.{0142e4d0-fb7a-11dc-ba4a-000ffe7ab428}
    mkdir "Power Settings.{025A5937-A6BE-4686-A844-36FE4BEC8B6D}
    mkdir "Icons And Notifications.{05d7b0f4-2121-4eff-bf6b-ed3f69b894d9}
    mkdir "Credentials and Logins.{1206F5F1-0569-412C-8FEC-3204630DFB70}
    mkdir "Programs and Features.{15eae92e-f17a-4431-9f28-805e482dafd4}
    mkdir "Default Programs.{17cd9488-1228-4b2f-88ce-4298e93e0966}
    mkdir "All NET Frameworks and COM Libraries.{1D2680C9-0E2A-469d-B787-065558BC7D43}
    mkdir "All Networks For Current Connection.{1FA9085F-25A2-489B-85D4-86326EEDCD87}
    mkdir "Network.{208D2C60-3AEA-1069-A2D7-08002B30309D}
    mkdir "My Computer.{20D04FE0-3AEA-1069-A2D8-08002B30309D}
    mkdir "Printers.{2227A280-3AEA-1069-A2DE-08002B30309D}
    mkdir "Application Connections.{241D7C96-F8BF-4F85-B01F-E2B043341A4B}
    mkdir "Firewall and Security.{4026492F-2F69-46B8-B9BF-5654FC07E423}
    mkdir "Performance.{78F3955E-3B90-4184-BD14-5397C15F1EFC}

    • From the Menu bar Click on File > Save As. The Save As dialog box opens.
    • Now save the file with any name but with a .bat extension. For example: Access.bat
    • Run the .bat file. A folder named Special Folder will be created, open it. Thats it!

    What is Windows Registry? how To create a errow message?

    The Windows Registry is a hierarchical database that stores configuration settings and options on Microsoft Windows operating systems. It contains settings for low-level operating system components as well as the applications running on the platform: the kernel, device drivers, services, SAM, user interface and third party applications all make use of the registry. The registry also provides a means to access counters for profiling system performance.
    By editing the Windows Registry we can produce some interesting results! But editing registry carelessly can severely affect the system and may lead to crashing of the Windows. Thus it is strongly recommended that you should backup the registry before editing it.
    Create Windows Log on Error Message:
    Here we will edit the registry to display a critical error message on the Windows logon screen.
    1. Click on Start > Run.
    2. Type regedit. Click OK. [Note: you should have the administrative privilege to open Registry Editor and edit it.
    3.  Now Navigate to the following key in the Registry Editor:
    HKEY_LOCAL_MACHINE\Software\Microsoft\Windows\Current Version\Policies\System
    Now do the following changes:
    1. Right-click on legalnoticecaption key. Click Modify... In the Value data box write something like Critical Error. [Note: this text will be the heading of the error message. ]
    2. Right-click on legalnoticetext key. Click Modify... In the Value data box write something like Windows cannot load. System files are corrupted due to malicious software present in the system. Insert Installation Disc and Click OK. [Note: this text will be the body of the error message.]

    Thats it!  next time whenever anybody logins the windows, an error message will be displayed on the logon screen. [The message is just a fake one and the system will start normally after the message]
    To remove the message from the Windows logon screen, just revert the registry keys value to the original, i.e, empty the Value data of both the keys.


    Build your own Internet Search Connector


    Windows 7 has a very useful new feature called a Search Connector that lets you search through a Web site from right inside Windows Explorer. With it, you type in a search term and select the Search Connector for the site you want to search; Explorer searches the Web site without having to open Internet Explorer, and the results appear inside Windows Explorer. Click any of the results to head there using your default Web browser.

    Normally, you'll need to get each Search Connector from the Web site through which you want to search, and very few Connectors are available.
    There's a work-around that will let you easily build your own Search Connector for any site, using Windows Live Search as a kind of go-between. Don't worry, you don't need to know any code to write a Connector. Just follow these steps:

    Copy the following text and paste it into Notepad. The text you'll need to change is in bold text:


    <?xml version="1.0" encoding="UTF-8"?>
    <OpenSearchDescription xmlns="http://a9.com/-/spec/opensearch/1.1/" xmlns:ms-ose="http://schemas.microsoft.com/opensearchext/2009/">
    <ShortName>NAME YOUR SEARCH</ShortName>
    <Description>DESCRIPTION OF SEARCH</Description>
    <Url type="application/rss+xml" template="http://api.bing.com/rss.aspx?source=web&query={searchTerms} site:SITENAME.COM&web.count=50"/>
    <Url type="text/html" template="http://www.bing.com/search?q={searchTerms}+site:SITENAME.COM"/>
    </OpenSearchDescription>

    In place of NAME YOUR SEARCH, type in the name of the search as you want it to appear. In our case, we're going to build a Search Connector for Tecnohertzz, so we'll just type in Tecnohertzz.

    In place of DESCRIPTION OF SEARCH, type in a longer description of the search. In our instance, it will be Search through Tecnohertzz.

    In the two SITENAME.COM entries, enter the Web site's domain. Don't use the http:// or www just the domain name. In our instance it will tecnohertzz.blogspot.com.
    To the right of "count=", type in the number or results you want to appear. In our instance, we'll keep it at 50.

    Save the file in Notepad, choose UTF-8 from the Encoding drop-down box near the bottom of the Save As screen, and give it an .osdx extension. In our instance, we'll call the file Tecnohertzz.osdx.

    In Windows Explorer, right-click the .osdx file and select Create Search Connector. The Search Connector will be created.

    You can now use the Search Connector. To get to it, in Windows Explorer go to YourName > Searches > Connector, where YourName is your account name, and Connector is the name of the Connector.

    Some Taskbar Tricks.


    Run multiple copies of applications from the taskbar
    The Windows 7 taskbar serves a dual purpose, which can get confusing at times. It's used to launch programs, and also to switch between programs that are running. So you launch a program by clicking its icon, and also switch to that program after it's running by clicking its icon.
    But what if you want to launch a second instance of the program? Once the program is running, it seems there's no way to launch a second instance, because when you click its icon, you only switch to the running instance.

    There's a simple fix: If a program is already running and you want to launch a second instance from the taskbar, hold down the Shift key and click the icon. A second instance will launch. You can keep launching new instances this way.

    Launch taskbar apps without a mouse
    You can launch any program on the taskbar without the mouse. Press the Windows key and the number that corresponds to the position of the application on the taskbar.
    For example, Windows key +1 to launch the left-most application on the taskbar, Windows key +2 to launch the second left-most application and so on.
    Press Windows key and the number again to minimize the app.

    See taskbar thumbnails without a mouse
    If you're a fan of using the keyboard rather than your mouse whenever possible, you can move your cursor from icon to icon in the taskbar without a mouse and still see thumbnail previews.
    Press Windows key+T, and you'll move the focus to the leftmost icon on the taskbar. Then, while still pressing the Windows key, press T again to change the focus to the next icon to the right. You can keep doing this as long as you like.
     
    Rearrange taskbar icons
    It's easy to rearrange the icons across the bottom of the screen. Simply drag an icon to where you want it to live. You can also add icons to the taskbar by dragging them from an application, and delete the icons by highlighting them and pressing the Delete key.

    Get back the Quick Launch bar


    Windows 7's new taskbar functions as a program launcher as well as task switcher. As a result, the old Quick Launch bar, the area on the left side of the taskbar that contained shortcuts for frequently used programs, has been banished. However, if you really miss the little applet, you can add it back. Here's how to do it:

    Right-click the Taskbar and choose Toolbars > New Toolbar.
    You'll be asked to select a folder for where the new toolbar should live. In the Folder text box at the bottom of the dialog box, enter this text:

    %userprofile%\AppData\Roaming\Microsoft\Internet Explorer\Quick Launch
    After you do that, click Select Folder. A link for the Quick Launch bar will be added to the taskbar. It will be on the right of the taskbar, just to the left of the Notification area.
    It's not particularly useful docked all the way to the right with no application icons showing, so we're going to have to do a bit of work on it to make it useful:

    1. Right-click the taskbar and, in the pop-up menu, remove the check next to Lock the taskbar.
    2. Now right-click Quick Launch and remove the checks next to Show Text and Show Title.
    3. Drag the vertical triple dotted line next to the Quick Launch bar to the left until you expose its icons.
    4. To prevent further changes, right-click the taskbar and check Lock the taskbar.
    You can now use the Quick Launch bar as you could in Windows XP and Vista, including adding icons to it and deleting them.

    Speed up the display of thumbnails on the taskbar


    One of the nicest things about the taskbar is that when you hover your mouse over the icons in it, you can see thumbnail previews of all open windows for each of those applications. When you do so, there is a slight delay before the thumbnail appears. But you can make the thumbnails display more quickly by using a Registry hack.

    Note:  Be very careful while editing registry. Serious problems might occur if you modify the registry incorrectly. Therefore, Backup your System registry beforehand. Visit: Backup Registry in Windows 7

    1. Click on Start > Run OR press Windows-key+R.
    2. Type regedit in the field and click OK. [You must have Administrator access].
    3. Now Navigate to the following registry:
    4. HKEY_CURRENT_USER\Control Panel\Mouse.
      Double-click MouseHoverTime. The default value you'll see is 400, which means 400 milliseconds. Type in a new, smaller value say 150.
    5. Then click OK and exit the Registry Editor.
    6. Log off or restart your computer for the change to take effect.

    Show all your drives in Windows Explorer


    Depending on your system settings, when you go to Computer in Windows Explorer, you may be in for a shock, you may not see all your drives such as memory card readers if those drives are empty. If you don't like this, there's a simple way for you to see them even if there's nothing there:
    In Windows Explorer click on Organize.
    Select Folder and Search Options. Then switch to the View Tab.
    Under Advanced settings, uncheck the box next to Hide empty drives in the Computer folder.
    Click OK. The drives will now always be visible.


    Set a new Windows Explorer launch folder


    When you run Windows Explorer, it always opens to the Libraries folder. That's fine if you use Microsoft's default file organization, which designates Libraries as the overall container for your folders. But what if you don't? You might prefer to have Windows Explorer open to Computer or any other folder you choose. Here's how to do it:


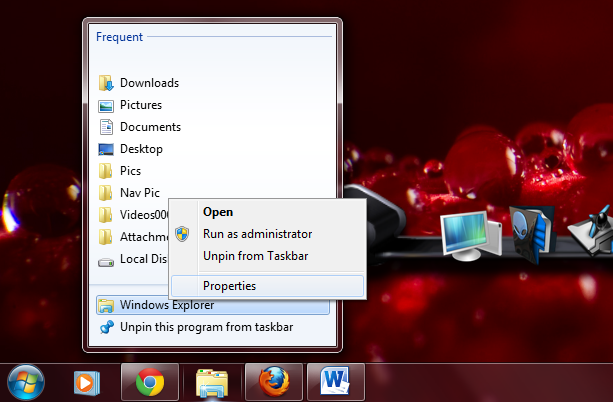
    • Right-click the Windows Explorer icon in the taskbar.
    • Then right-click Windows Explorer from the menu that appears.
    • Select Properties from the context menu that appears.
    The Windows Explorer Properties dialog box appears. You'll have to edit the Target field on the Shortcut tab of this dialog box in order to change the default location at which Explorer opens.

    If you want Explorer to open to a specific folder, simply enter the name of the folder, substituting your folder name for Folder, below, like this:
    %windir%\explorer.exe c:\Folder

    If you want Explorer to open to special, pre-set locations, such as Computer, you'll need to enter special syntax in the Target field. Following is a list of three common locations and the syntax to use, followed by the syntax for the Libraries folder in case you ever want to revert to the default.

    Computer: %windir%\explorer.exe ::{20D04FE0-3AEA-1069-A2D8-08002B30309D}
    My Documents: %windir%\explorer.exe ::{450D8FBA-AD25-11D0-98A8-0800361B1103}
    Network: %windir%\explorer.exe ::{208D2C60-3AEA-1069-A2D7-08002B30309D}
    Libraries: %SystemRoot%\explorer.exe
    After you've changed the Target field, click OK. Next time you launch Windows Explorer, it will open to the new location you've designated.

    Protect the privacy of your Explorer searches.


    When you search through your PC from Windows Explorer, you can see the most recent searches that have been performed. If you share a PC and don't want others to see what you've searched for, you can turn off the recent searches feature:


    • Click on Start > Run OR press Windows-key+R. 
    • Type GPEDIT.MSC and press Enter to run the Group Policy Editor.
    • Go to User Configuration > Administrative Templates > Windows Components > Windows Explorer.
    • Double-click "Turn off display of recent search entries in the Windows Explorer search box"
    • Select Enabled from the window that appears. Then click OK.

    Open a command prompt at any folder


    If you often use the command console then you will like this interesting trick! When you open the command prompt the default path that opens up is your user folder, for instance: C:\Users\John>. If you open it as an administrator then the path would be: C:\Windows\system32> [C: is the system drive here]. We can change the path by the CD command. But with this trick we can easily open up the command prompt console at a desired path. To do this:

    Hold down the Shift key and right-click a folder, then choose "Open command window here" from the context menu that appears. (Note that this tip doesn't work in the Documents folder.)

    Use check boxes to select multiple files


    In order to select multiple files for an operation such as copying, moving or deleting in Windows Explorer, we generally, Ctrl-clicking every file you want to select.
    But if you're mouse-centric, there's a way to select multiple files in Windows 7 using only your mouse, via check boxes.

     To enable this:
    • In Windows Explorer, click Organize, and then select "Folder and search options."
    • Click the View tab.
    • In Advanced Settings, scroll down and check the box next to "Use check boxes to select items." Click OK.
    From now on, when you hover your mouse over a file in Windows Explorer, a check box will appear next to it; click it to select the file. Once a file is selected, the checked box remains next to it; if you uncheck it, the box will disappear when you move your mouse away.

    Add a Videos link to the Start Menu


    The Windows 7 Start Menu includes links to your Pictures and Music folders, but not to your Videos folder. If you watch a lot of videos and want a link to them on your Start Menu, you can do it by following steps:

    1. Right-click the Start button and select Properties.
    2. Then go to the Start Menu tab and click Customize.
    3. In the dialog box that appears, scroll to the bottom, look for the Videos section, select "Display as a link," and click OK and then OK again.
    4. If you'd prefer that Videos display as a menu, with links to files and submenus, instead select "Display as a menu."

    Search the Internet from the Start Menu


    The start menu is convenient way to search the applications and programs through your system. But you can also have it do double-duty and perform Internet searches as well. To search internet right from the start menu follow these steps:

    • Click on Start > Run OR press Windows-key+R.
    • Type GPEDIT.MSC and press Enter to run the Group Policy Editor
    • Go to User Configuration > Administrative Templates > Start Menu and Taskbar.
    • Double-click "Add Search Internet link to Start Menu"
    • from the Window that appears, select Enabled.
    • Then click OK and close the Group Policy Editor.
    Now a "Search the Internet" link is shown when the user performs a search in the start menu search box.This button launches the default browser with the search terms.

    If you disable this policy, there will not be a "Search the Internet" link when the user performs a search in the start menu search box.
    If you do not configure this policy (default), there will not be a "Search the Internet" link on the start menu.

    Similarly you can check out various other interesting Policies listed there!

    Modify the User Account Control Security

    The User Account Control security feature was one of the most reviled additions to Windows Vista, with good reason -- its constant warning messages asking for permission to continue many operations drove users around the bend.
    UAC has been significantly improved in Windows 7 so that it's not as intrusive as in Vista, but you can still tweak it if you like.
    Here's how to turn UAC on or off, and make it less or more intrusive than the default:
    • Go to the Control Panel --> User Accounts and Family Safety.
    • Click User Accounts, then click Change User Account Control settings.
    • From the screen that appears, use the slider to select the level of protection you want.
     Here are the four levels and what they mean:
    Always notify me. Think of this as UAC Classic. It works like Vista's UAC: When you make changes to your system, when software is installed or when a program tries to make a change to your system, an annoying prompt appears.
    Default - Notify me only when programs try to make changes to my computer. This is, obviously, the default; make a change yourself and UAC leaves you alone. When a program makes a change, a prompt appears and your desktop goes dark, just like it does in Vista. Otherwise, UAC sits there silently.

    Notify me only when programs try to make changes to my computer (do not dim my desktop). This setting is identical to the default setting, with one difference: It won't dim your desktop so that you only see the UAC prompt asking you to take action. This presents a slightly elevated security risk over the default setting, because theoretically a program could allow a malicious program to interfere with the UAC prompt.

    Never notify me: In this one, UAC is completely turned off. This is, of course, an insecure option and not recommended for most users.

    After you make the selection, click OK. Depending on the selection you made, you may need to restart your system for it to take effect.

    Use Hidden International Wallpapers and Themes.


    When you first install Windows 7, it asks for your language, time and currency. Based on your responses, it installs a set of wallpapers and themes. If you choose English (United States) for your time and currency format, for example, the available desktop backgrounds and themes will include a United States section with scenery from locations such as Maine, the Southwest and so on.
    Hidden, though, are background scenery and themes from other English-speaking countries -- Australia, Canada, Great Britain and South Africa. Normally, you can't access those backgrounds or themes, but there is a simple way you can install and use them:

    • Open Windows Explorer
    • In the Address Bar type
     C:\Windows\Globalization\MCT
    [C: is the System Drive here]
    • A List of Sub-folders will Appear

    MCT-AU, MCT-CA, MCT-GB, MCT-US, and MCT-ZA. Each subfolder has wallpapers for a specific country:
    • AU for Australia.
    • CA for Canada.
    • GB for Great Britain.
    • US for the United States
    • ZA for South Africa.
    For any of the countries whose wallpaper and themes you want to use, go into its Theme folder, for example, C:\Windows\Globalization\MCT\MCT-ZA\Theme. Double-click the theme you see there. That will install a shortcut to the theme and wallpapers in the Personalization section of Control Panel.
    You can now use them as you would any other theme or background, by right-clicking the desktop, choosing Personalize, and choosing a background or theme. They will be listed in their own section.